Stage IV The other sections
User Guide Stage IV: How to create and edit the other sections
Other sections
1. What are sections and how do they work?

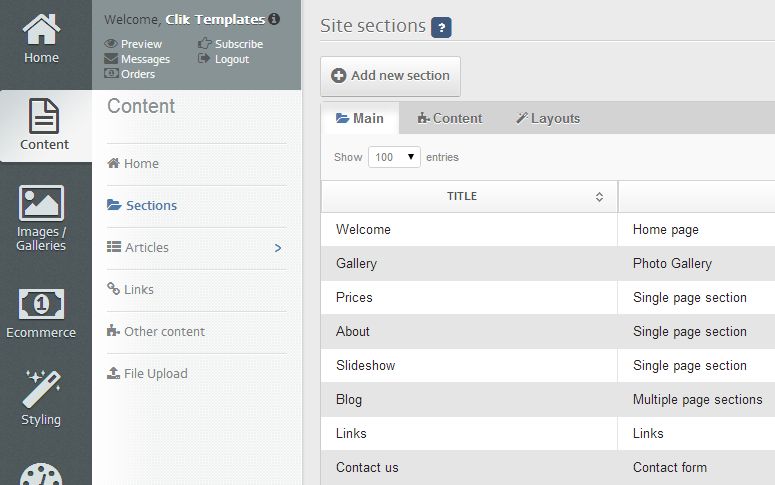
As well as the Home page and the Gallery section/s, you can create as many other sections as you want, e.g. a Blog, Slideshow, About me, etc. Your site may have some sections pre-defined as examples. To edit or remove them, go to Content > Sections and click the pencil to edit the section you want.
To add a new section, you need to understand a little about the different section types. For example, the About me page is a Single page type section, which can be used for just about any notice or piece of information. The Blog is a Multiple page section, ideal for news, events or listings. The Contact section is a Contact form.
Before adding, a new section, decide on what is the best type.
2. Creating and editing a single page section
Single page sections include a heading, an (optional) introduction, and space for text. They are therefore ideal for “About us” pages, simple announcements, statements or general information. Just about all of our templates have an About page, which you can edit by going to Content > Sections and clicking on the pencil icon.
You can create a new section by clicking on Add new section at the top and selecting Single page. Name it whatever you like and click Add. Complete the fields as prompted, namely Title, Intro, Main text content, and Show in menu. Ignore all other fields at this stage. Once you have entered all of this, click on SAVE at the bottom and then preview.
Formatting text
You can format the text using the icons on the editing page. For more details, see part 5 of Cliktips Guide C2 Formatting text.
«cliktip»
3. Blog, news or events pages using 'multi page section'
3.1 Introduction
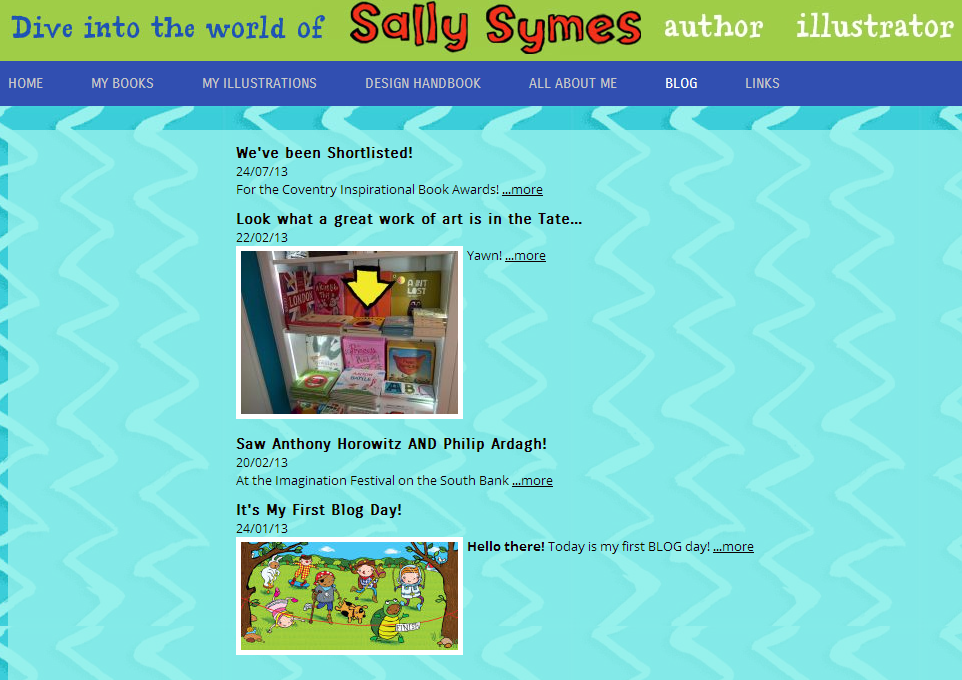
Multi page sections allow you to list a series of “articles” in that section, typically in date order, with an optional link for further information and image upload. These sections are perfect for blogs, news, series of information pieces, notes, admin notices, etc.
There are two stages to creating these sections – 1. Editing/creating the section itself; and 2. Creating the Article/s that appear in the section (e.g. the actual blog entries)
3.2 Stage I: Editing the Section
To edit the main section, click on Content > Sections. Either edit an existing multiple page section or create a new one.
In addition to the usual section information, there are some fields specific to this section type:
Show dates. Tick if you would like the dates to appear in the listing.
Show straplines. Tick if you would like the introduction paragraphs to appear in the listing. You almost always want this to be on.
Show images. Show article images in the listing, either thumbnails or as full size images.
Show link. Add a short link to the full article (if any)
Link text. The text of the link to the full article e.g. "read more..."
Sort by Choose how the articles will be sorted. For news or a blog, always choose “date descending”.
Load content inline If selected, the full text of the articles will be displayed by expanding the page inline when the users click on the Link.
3.3 Stage II: Creating articles/blog entries
To create an article, go to Content >Articles in the admin system. Click on New at the very top, or click on edit (the pencil icon) against one of the existing articles.
Add a headline and a strapline as a minimum. Optionally add a date, the body (the main text) and an image, then SAVE the record.
If you have more than one multi page section, you will need to select which one it appears in.
Now preview your site to see the section and the blog entry.
3.5 Adding news to your home page
You can add your latest news to your home page or any other part of the site by using the Articles type of content section.
Go Content > Other content. Ensure you are on the Custom tab and click Add content item. Select Articles as the type, name and save the section.
Then ensure you have the correct Section selected (if you have more than one) and set the content section to appear where you want it (e.g. Home page only, positioned in the sub column).
You'll usually want to have “show title” selected so that users know what the list is showing.
4. Creating a links section and adding links
You can create directory lists using a links section.
There are two stages: 1. Editing the Links section itself. 2. Adding/editing individual links.
Editing the Links section. Go to Content > Sections > Click on the pencil icon to the right of the Links section. If you tick Use address fields the system will add fields in the individual links for address, telephone number and email. This can be useful if you would like to use this section as a directory.
Adding/editing individual links. Go to Content > Links > Click on New at the top and enter the link information. Create a new record for each link.
5. Contact Forms
A contact form allows your website users to contact you through a ‘form’ rather than just a straight email link. A notification of any messages they post will be sent to your email address (the one you used to register with us); and they will also be listed in the Messages section in your admin system. Not only does this look a lot more professional than simply quoting an email link, it allows you to collect information that you may need, such as address and phone number.
To edit the questions on the form, go to Site management > Forms.
For full instructions, see Cliktips Guide C6 Editing forms.
5.1 Guestbook
Our Guestbook facility allows you to post messages you have received onto a Guestbook section on your website. To create the Guestbook, go to Content > Sections and add a new section in the usual way. Select type Guestbook > Click Preview to have a look and you will see that a Form has automatically been added.
To add a Message to your Guestbook, go to Messages > Click on edit against the message you would like to post > Change the Status to Use on Guestbook > Click Update record > Preview to have a look.
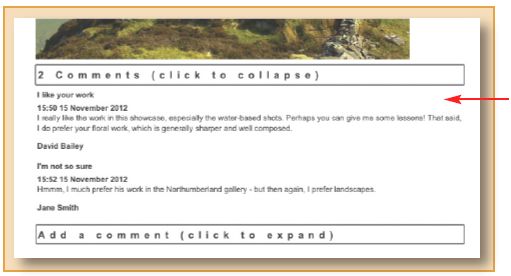
5.2 Comments facility
This facility allows you to post comments/messages on various parts of your site, not just your Guestbook. This can be useful, say, if you’ve had a positive comment about a particular image. For instructions, see Cliktips Guide C7 Comments.
6. Slideshow sections
You can use a slideshow section to showcase your favourite pieces of work. In some templates, slideshows also feature on a smaller scale on other parts of the site.
If you don't already have a slideshow section, create one. Then, to assign images to the Slideshow, go to Images/Galleries > Images > Edit the respective image and under the field Image set select Slideshow section > SAVE. You can have an image assigned to more than one Image set.
7. Other ideas
7.1 Creating sections within sections (‘Parent’ and ‘Child’)
You can also create different types of sections within a ‘parent’ section. For example, you could have a section entitled ‘About us’, within which you have a Single page section entitled ‘Terms & conditions’, and another Single page section ‘Postage & packing’. This is covered in Cliktips Guide C1 Menus and site structure.
7.4 Create a 2nd menu
Ideal for sections that you don't want to appear in the main menu but you still need on your site, say, in a footer menu, eg Terms & Conditions and Company Information. Again, this is covered in Cliktips Guide C1 Menus and site structure.
7.5 flickr gallery
Here you can display images that you may have in a flickr gallery without using up your image allowance. These can also be displayed as a slideshow. See Cliktips Guide A7 Adding a Flickr gallery for instructions.
