C7 Comments
Download PDF Version
1. What is the Comments facility?

Our Comments facility allows you to invite comments from your users on various parts of your website - and then post them, if you so wish. You can use them for an individual image/product, a specific gallery, an entire gallery section, an article or a single page.
They are a great way of getting your users to interact with you and for encouraging general feedback. You can also use them as customer reviews for specific products or images.
2. How to set one up
Go to Content Sections and click on edit against the section where you would like the comments to appear. This can only be within a Gallery,a Multi page or a Single page section (we have used Gallery in this example) Tick the field Use comments, which is usually the last one This pop-up box below right will appear Tick for which pages you would like the Comments to appear on (see also notes below).
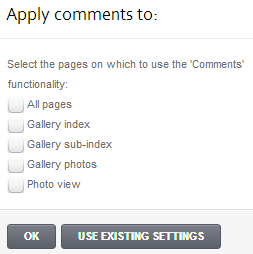
All pages. Comments will show on all pages within the gallery.
Gallery index. This is the page where your galleries are listed.
Gallery sub-index. If you have sub-galleries, this is the page where the sub-gallery headings are listed.
Gallery photos. Where you see the thumbnails within a gallery.
Image view. An enlarged image.
OK. To save the record. Click on Preview to see how it works and looks like.
If you would like to change your selection, untick the Use comments box Update record then tick Use comments again Choose a different location.
Please note, you can not use Comments for photos in Pop-up mode or Slideshows! For Multi page sections, the Apply comments to options are slightly different. Select either All pages, Article list (where a summary of the articles are listed); or Article view (within the main article itself).
3. Receiving and posting comments
This works in the same way as our Guestbook system. When a user posts a message on your site, it appears in the Messages section of your admin system, and an email is sent to your registered email address with the message included. You can find Messages either in the shortcut menu at the top left of your admin system, or by going to Site management Messages.
If you would like it to appear on your website, click on edit against the specific message Under Status select Use as comment from the drop down menu Update record Preview and Make live when ready.
If you select Use on guestbook for Status, then it will appear in both your Guestbook and the Comments section.
4. Editing the question fields that the user completes
As with your standard Contact section and any Guestbook section/s you may have created, you can also add or edit the question fields that your user completes when posting a comment. For example, you may wish to add a question such as ‘Mark out of 10 for this image’.
When you add a Comments section a new ‘form’ is created, just like a Contact form or Guestbook. To edit this, go to Go to Site management Forms Click on edit against the Comments form Click on the button EDIT FORM QUESTIONS and add/edit your questions accordingly. If you're unsure or get stuck, have a look at Cliktips Guide C6 Editing forms, where full instructions are given.
5. Editing how Comments appear
5.1 Which fields appear and their order
You can edit what appears and in which order. For example, you may want the user’s name to be at the top; or the time of message to be excluded. These can be edited by going into the respective Section record Click on the Content tab right at the top Scroll down until you see the Comments record which you open by clicking on the pencil icon at the end Click on the Styling tab at the top Open up Comments by clicking on the small square box Then Options Click on edit against the respective field depending on what you would like to do, as follows.
Title text. The title of the message the user entered appears here. If you would like a different field to appear, select from the drop down options. Select Blank if you don’t want anything.
Date text. If you select Date, then the time will be removed and vice versa. You can also change the date and time format, see 5.3 below.
Body text. This is the message the user has left.
Show other questions. If you have customised your questions and added additional ones, they will appear here.
Show comments ‘No results’ message. If no comments have been posted a No Results message will appear. This can be edited too, see 5.3 below.
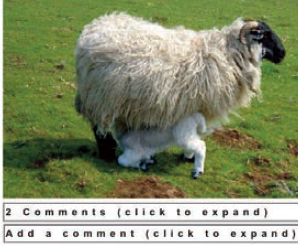
5.2 Turning off/on the expand and collapse feature
You can choose whether to use the expand and collapse functionality of the boxes. For example, you may want all of your messages to appear without the user having to expand the box.
To control this, follow the same instructions as for 5.1, but instead of selecting Comments, select Title Scroll down and click on edit against the field Title expands content Select Yes.
You can even change the text that appears on these boxes, see 5.3 below.
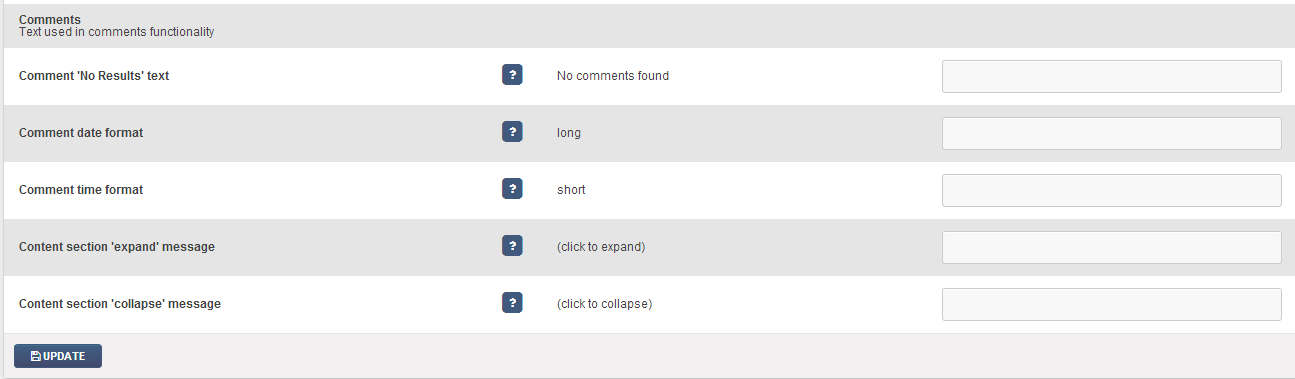
5.3 Changing some of the default text fields
You can also change some of the default text fields and date/time formatting which appear throughout the Comments feature. These are controlled by going to Site management Text/language Scroll right down until you see a series of records entitled Comments. Text used in comments functionality (usually right at the bottom) Click on the help icons for guidance as to what each record relates to and update accordingly.