C6 Editing forms
Download PDF Version

1. Introduction
Our Contact forms are an excellent way of enabling your users to contact you through a professional looking form on your website. They also enable you to ask specific questions that might not therwise be given. This guide shows you:
How to add/edit your own questions and whether to make them compulsory or not.
How you can set up captcha graphics, which help prevent you receiving unwanted spam mail.
How to set up a Contact form just about anywhere on your website.
If you haven’t created or edited a Contact form before, we cover this in more detail in Section 9 of the Easy Start Guide. Alternatively, for quick reference, you can go to Content Sections part of your admin system, where you will see a default contact form there and/or add one in the usual way for a new Section.
2. The default fields
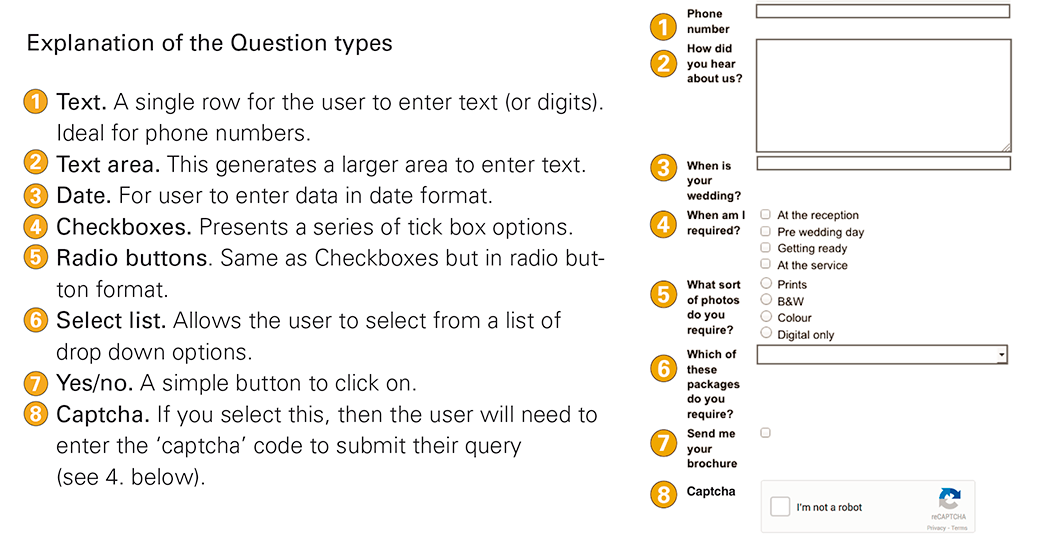
There are four standard questions which can’t be removed in a form. Your name, Your email, Subject and Message. You can rename these and make them optional if you wish. You can then add as many additional questions as you like, in a variety of optional formats, as we have done in this example.
3. How to edit a form
3.1 General settings
In the admin system, go to Site management Forms. Here you will see the form for the default Contact section Click on the edit button (the pencil icon at the end right) You will see a list of general settings which you can edit if you wish, or just leave as default, which most users do:
Name. For your internal reference only. To change the name on your main menu, edit the record in the main contact Sections record (Content Sections).
End message. The text that appears after your user has submitted a message.
Submit button text. The text that appears at the bottom of your form inviting your user to submit the form.
Submission error text. Text can be added for the submission error message, eg if the user enters text in, say, a date field. By default this is Sorry, there was a problem with your submission. (please note that each question can also have an individual error message.)
Notes. For your internal use only.
3.2 Adding, removing and editing questions
To add and edit individual questions, use the separate form below the form information.
To edit a question, click on it. To change its order, drag the handles to position in order.
To add a new question, click the “Add question” button at the bottom of the list. A new question will appear in the list. Click “edit” to edit it.
Edit the fields as follows:
Question. The question you would like to ask.
Question type. Here you can select from a range of different types of questions, ranging from basic text fields, to date formats, multi choices, etc. There is quite a range, so see the panel below for a description of each.
Optional. Tick if you would like to make this an optional question. If left blank, your users will not be able to submit their message unless they complete this field.
Error message. If you would like to amend the default error message, enter the text here (see 3.1 above).
Click update to close the edit dialogue and then save the form.
4. Using ‘captcha’ graphics
‘Captcha’ graphics may be a slight inconvenience to some, but they really are a useful tool in preventing spam mail. The initial setup is a two stage process, as follows.
4.1 Initial Captcha setup
Before you can use captchas you must generate a “Site key” and a “Private key” from Google which you then insert in your admin system. To do this, you will need to have a Google account:
Go to the ReCaptcha page, and sign into your Google account
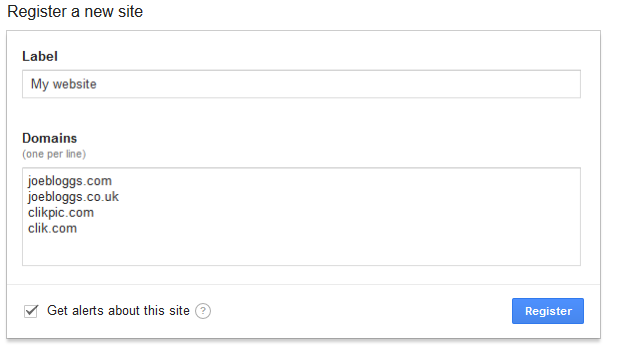
Register a new site and insert a label (this is for your reference only) and insert all authorized domains, one per line. Enter all your domains you may have, plus clikpic.com and clik.com. The result will look somewhat as in the screenshot below.
It is really important that you enter all the domains in your account, including clikpic.com and clik.com, otherwise the captcha may not work fully in your preview or live site. Also ensure you enter the domains WITHOUT the www. prefix.
Now go to Site Management Site details and enter the Site key and Private key into their respective fields.

4.2 Insert Captcha graphics into your forms.
Once the initial setup is completed it is incredibly easy to insert Captchas to any of your forms. Just add a question at the end of your Form as outlined above. For the Question field, enter something like “To help us prevent spam, please tick the box” For Question type select Captcha That’s it!
Please note, we have little control over the exact style and format of the captcha graphics we use.
5. Adding a Contact form to (just about) any part of your website

You don’t necessarily have to have your Form as a separate section – you can add them to just about any part of your site using our Other content facility. Whilst this excellent feature is covered more thoroughly in Cliktips Guide A1 Other Content, here are the basic steps.
In the admin system, go to Content Other content.
Under Add content item, select Form and enter a Name.
Click on Add content item.
Under Apply to all sections, select Only show on the sections selected.Unless you’d like it to show on all Sections, in which case select Show on all sections.
Under Sections, choose which one/s you’d like it to appear on.
Choose a position. You may need to try different positions as they are not always suitable for certain pages or design styles. The system does allow you to fine tune the position, instructions for which can be found in Cliktips Guide A1 Other Content part 6.
Tick Show title if you would like the Title to appear on your website.
Update record.
