Blog
ND Filters and Long Exposures
02/03/16
We have all seen those images with “Milky” smooth water and streaked clouds, I’m asked time and again how it’s done and the best technique. So here’s some information and a few tips from my own experience gained over the years.

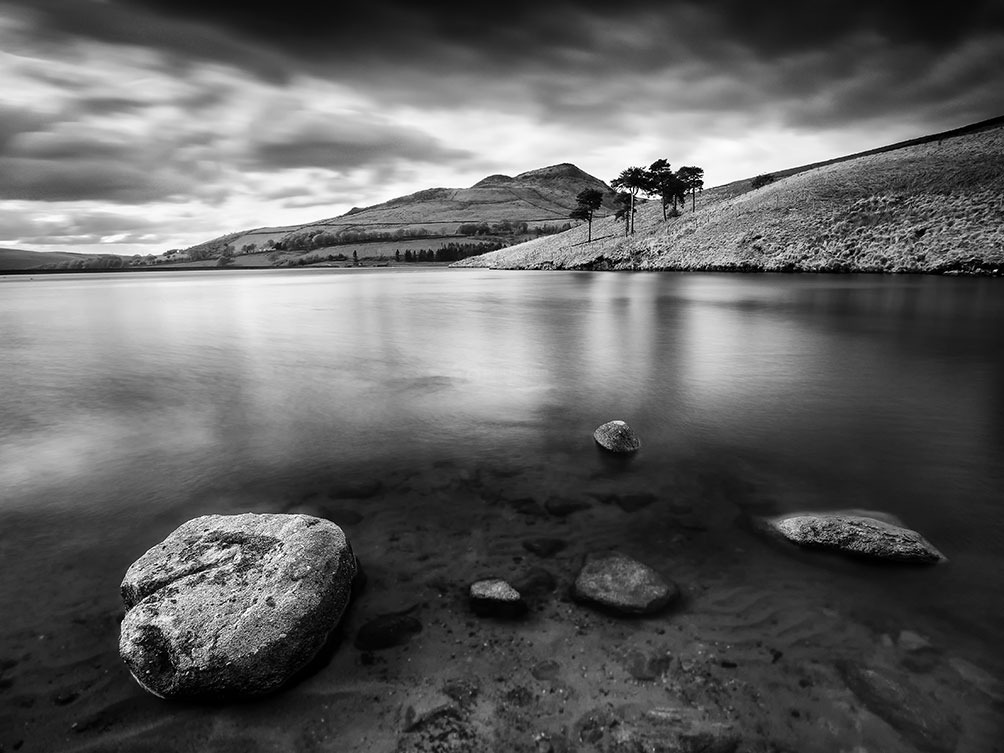
Dovestone Reservoir-Olympus OMD EM5ii 7-14 Pro, 7mm f7.1, Iso 200 10 seconds with Nisi IR ND1000 10 Stop.
What Filter To Use.
It’s simply about extending the shutter speed to give the effect you want. The best way is to use an ND filter, basically a dark piece of glass, available in different grades of darkness to alter the exposure length. It’s also possible to extend shutter speeds although not as much with just a polarizer which will give 1-2 stops ND, or combining both. Sometimes a polarizer will be a good choice to remove unwanted reflections and give colours a punch, sometimes you want to keep reflections, so benefit from the 1-2 stops ND and rotate it to retain reflections.
Choosing the filter and shutter speed depends mostly on the effect you want, and the light you’re shooting in. On a very bright day a 10 stop may be needed just to get a few seconds exposure, whereas in a low light dark wood just a polarizer will do, or nothing at all. In low light at dusk or dawn to shoot sea water turning misty as it swirls around rocks a 10 stop could be far too much, a 5 or six stop may be better.

2 images with a different effect, one with 6 seconds to turn water misty, the other only 1/20' to capture water trickling off the rocks and movement of the waves.
Image 1-Olympus EM5ii, 7mm f6.2 6' 5 Stop ND 2 Stop Hard Grad
Image 2-Olympus EM511, 9mm f9 1/20', 3 stop Reverse Grad
Learning which filter will be appropriate comes with experience and experimentation, the first mistake people make is thinking every shot needs very long exposures; it doesn’t.
Think about what you want to do and what technique will best serve the subject, a waterfall won't always give the best texture and impression of movement at 20 seconds, 0.5 or 1 second may be better. A lake with ripples on the water may be best with the ripples captured, or turned completely to glass. It depends on what you want to say, the mood you want to convey, and how you read the scene. There may be times when you decide you really want to go for it and use 40,50, 60 seconds or even longer.

Both these images convey a different effect and were taken on the same day. One has milky soft water, the other has more texture to capture water trickling off the rocks and in the pool.
Image 1-Olympus EM5ii, 7mm f7.1 1' Square Polariser
Image 2-Olympus EM511, 9mm f7.1 8', 6 stop Nisi IR ND
Capturing cloud movement will depend on the speed of the clouds and how you judge it, as fast clouds may only need a few seconds, whereas slow movement will obviously need much longer. The longer the exposure the more noise you will introduce, so it's best not to do 60 seconds when what you want to say can be done equally as well with 10 seconds. On a bright day a long exposure may not present too much of a problem with noise, but in low light it's inevitable. Judge the scene and the movement, the available light and decide how best to approach it to tell your story, and don't just jump in with a long exposure for the sake of it. With clouds try to get a position where they are coming towards you for dramatic images, or moving at an angle that will create a lead in line.
Read the light, see what shutter speeds you are getting without a filter before you decide which to use, and decide what you want to do. Experiment. Will the sea-water around those rocks at dusk look better with just a few seconds, or would 30 or 40? Once you start to recognise how bright a scene is and what the shutter speed is, you will start to have a feel for how many seconds you will get with a given filter and start to decide without having to work it out.

The same image as above with just a graduated filter to control the sky. Olympus EM5ii, 7-14 Pro, 7mm ISO 200 f7.1 1/125s. If you do a long exposure don't neglect a normal exposure. Compare this with the long exposure image, they both have merit and at the end of the day, you get two images for the sake of spending a few more minutes.
Most people find having a 10 stop ND suits most of their needs. If you want to experiment and try different techniques, I would recommend a 5 or 6 stop, a 10 stop, and of course a polarizer. You can even stack a 6 and 10 and go crazy.
Working out how much exposure an ND will give is complicated when you have fast shutters (I don’t do maths) because it’s doubled or halved reciprocally, the same as apertures, so if you had a 10 stop ND and a shutter of ¼ without a filter, it would work like this, for each ‘stop’:
¼, ½, 1’, 2’, 4’, 8’, 15’, 30’, 60’, 120’
Of course it’s different with a faster shutter, but you can see where it’s going. That's why having a 5 or 6 and a 10 is useful. I prefer Nisi IR ND filters because they are neutral and don’t give the dark corners some others do.
As a rough rule fast moving water, a waterfall, stream, brook, may only need as little as 1/2 second to a few seconds to soften the movement. To turn it 'milky' may need 5, 10, 20 seconds, depending on the ambient light. At the coast or a lake again the same applies, the brightness of the scene will determine which filter and shutter speed will give the best effect. It's very personal and you decide what you want to do, the point is to experiment, think about it and not to presume a 10 stop will do for everything.
Be Square Or Go Round
ND filters are available in round screw in filters and square slot in systems, and even Variable filters called Faders. What type you choose depends on your own preference and there are pros and cons to each.

Image 1-Square Systems
(Olympus 7-14mm Pro with Nisi v5 System, Adapter, IR ND1000 10 Stop and 2 Stop Hard Grad)
Square systems use a filter holder attached to the lens via lens rings, and filters simply slide into the holder. The advantages to this are one system will generally fit all your lenses via different sized lens rings and step rings. They will also allow the use of other filters for exposure control, such as Graduated filters, Reverse Grad filters and Polarisers. It's very easy to stack filters so when you set up for a long exposure and find the sky will over-expose just pop a grad filter on too. Top quality filters are expensive, so it's best to choose wisely and start off with the best and build a system. Cheap systems are available which are good to experiment with, but poor quality will always have an impact on your precious high quality glass with poor contrast, colour cast and flare. Some don't like square filters because of the size, 100mm is the standard. Personally I don't have an issue with it, it's something you get used to and gives much more freedom. I have a shoulder case full of filters so I don't have to rummage around in my bag. It's also easy to remove an ND if struggling to focus in low light.
Image 2-Nisi V5 System
(Olympus 12-40 Pro with Nisi V5 and Polariser)
One of the top brand filter manufacturers and my choice, Nisi, with it's remarkable and ingenious V5 system. The main lens ring doubles as a polariser, with the glass itself being removable. It's advantage is unlike other systems the polariser is closest to the lens and light sealed, so no rear reflections, and no huge costs. Remove the holder and it acts as an independent polariser. It's supplied with lens rings for 62, 72 and 77mm, the most common sizes. For other sizes just use a step ring. Attention to design for the adapter and rings means there is no need to purchase Wide Angle adapters as with other systems, it will not vignette on M4/3 lenses down to 12mm and DSLR lenses down to 17mm using standard rings.
If you use the Olympus Pro lenses this is the size and system to consider. With the Adapter it can be used on the 7-14 Pro, 12-40 Pro and 40-150 Pro.
Image 3-Round Filters
(Olympus 12-40 Pro with 77mm B+W 10 Stop ND, step rings from 62-77mm used)
Round filters are simple to use and the man advantage is there's never any issue with light leaks for long exposures. Square filters don't have this problem if you use a good quality filter with a gasket on the rear. Some people prefer using round filters, and instead of buying various sizes, choose the largest needed and use step rings for smaller lenses. One disadvantage is having to remove a round filter if focus is an issue, although magnetic adapters are now available. Removing a round filter without one of these adapters can be tricky, especially if you use a cheap filter, the threads can bind very easily. Stacking round filters is possible but when you choose a round filter make sure the size is going to allow for adding filters together without causing vignetting. There will be a limit to how many you can stack because of the metal filter body. Graduated filters are not available for round filters, so if you go down that route and want to use grads you're out of luck. You can use a round ND, add a filter holder to it and then use square grads, and then consider if you wanted grads maybe best going square to start with. It can start getting fiddly when you have to start removing them from the lens and you may get vignetting.
Image 4-Faders
(Olympus 12-40 Pro with Nisi 4-500 Fader ND 67mm with step ring)
Variable ND filters, called Faders because you can turn them to fade the ND amount, can be useful. This Nisi Fader gives 2-5 stops ND in one filters, others are available. They can be very useful and very popular with video shooters who need to shoot wide open but need to control the light on the fly without swapping filters. They have the same drawbacks as round filters, but used on their own can be useful. Faders are essentially two polarisers put together, so you cannot use a polariser with a Fader. Some Faders, because they are two polarisers, can give a strange pattern resembling a cross across the image and are not suitable for wide lenses. The Nisi 4-500 however is good down to 17mm (DSLR) and 9mm (m4/3).
Of all the system I find using square filters the most flexible and easy to use. It gives me the freedom to do what I want and the flexibility to react to any given scene I'm shooting without fuss.

3 images with different techniques to convey a different mood and tell a different story to the viewer.
Image 1-I wanted to convey the speed of the clouds and turn it surreal with a lone figure standing in the shot.
EM5ii 7mm f6.3, ISO 200 25' Nisi IR ND1000 10 stop.
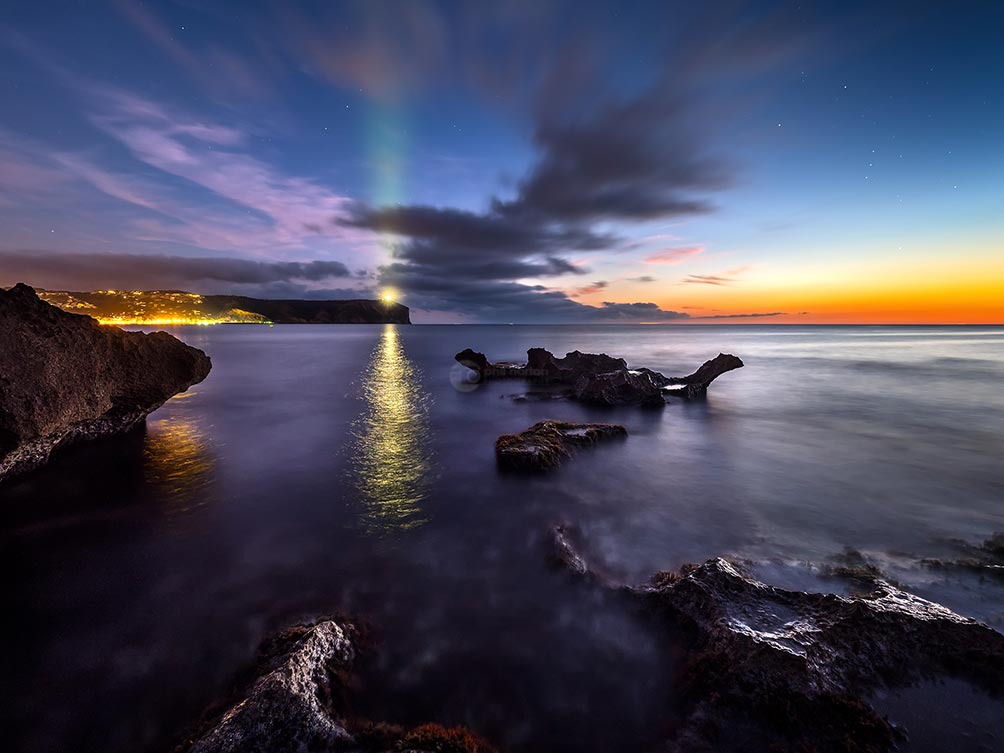
Image 2-This image needed to capture the drama of the sea, too long an exposure would have worked against it.
EM5ii 12mm f9, ISO 200 1/3' Nisi Polariser to slow shutter and remove reflections from the foreground.
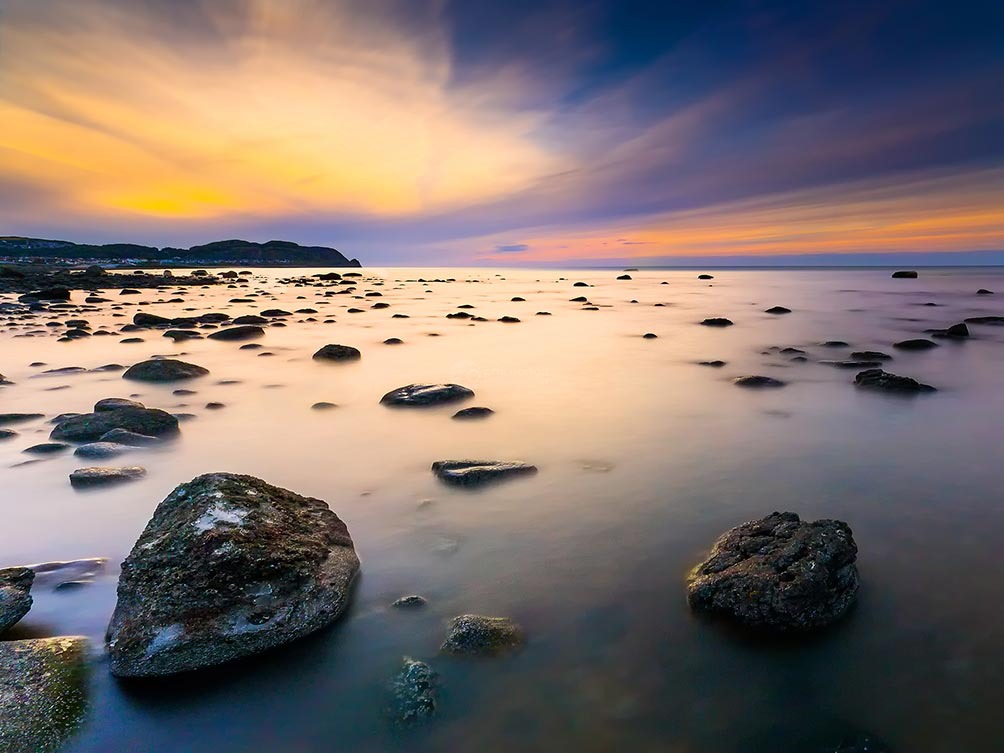
Image 3-A long exposure to turn the water to glass, I wanted the sea and sky to blend to give the viewer a sense of depth.
EM5ii 7mm f6.3 ISO200 25' Nisi IR ND1000 10 stop.
A few more example images:

Olympus EM5ii 7-14 Pro, 7mm ISO200 f8 Nisi 6 stop ND, 10 seconds.
Olympus EM5ii 7-14 Pro, 7mm ISO 200, Nisi 10 Stop ND, 20 seconds.

Olympus EM5ii 7-14 Pro, 7mm f7.1 Nisi 10 stop ND, 15 seconds.

Olympus EM5ii 9-18mm, 9mm f8 ISO200 Nisi 10 stop ND, 25 seconds.
Now The Technique.
Obviously you need a tripod, and a cable release to avoid disturbing the camera. You can use a wireless remote, self-timer, or an app. Olympus have their own app. You need to be rock steady, depending on the length of exposure, any movement will ruin the shot.
In the old days you would have to take a reading, then calculate the exposure depending on the ND filter used, set it, shoot it, check and shoot again because its not quite right. Now there are apps that will give the recommended exposure depending on the ND and aperture, so set to Manual, set the aperture for the best depth of field, ISO, and set the shutter speed according to what the app tells you.
If it’s dark and you can't see through the filter, set the focus, then switch to manual focus so you don’t disturb it and put the filter on. In many situations you will be able to see through the filter to focus, but once you have, still set to manual focus so it doesn’t try to hunt for focus if you need to do another shot. You may want to bracket the shots for blending later, if the focus point moves a fraction it could cause issue. At dawn or dusk using a high power torch to illuminate the focus area also helps. I use a Thrunite LED torch, it's small, tough and at 1000 lumens packs a punch.
Take the shot, check and see if you’re happy with it, and consider whether shorter or longer will be better by adjusting the ISO or aperture. Remember stopping down the aperture too much will cause loss of sharpness because of diffraction, and higher ISO’s noise, so if you can’t get what you want, use a different filter. If you are stopping down way past what you would normally for a landscape (m4/3 f6.3, 7.1, or DSLR f11-f16) to get the exposure length, you’re using the wrong filter. It is a ‘get out of jail’ card but not something to do habitually because sharpness and contrast is going to suffer. If you let the camera meter the exposure and it’s too dark it's common so don’t panic, the camera is metering through a dark filter and doesn’t always get it right. If you set up Manual mode, just increase the exposure a little, the same as using exp comp, or in Aperture Priority use + exposure comp. Generally an amount equal to 1/3, or a stop will do the trick.
Olympus EM5ii 7-14 Pro 7mm f9 ISO 100 1 second Nisi Square Polariser
With Olympus it’s so easy shooting long exposures with "Live Time". If the scene and the filter is dark, too dark for the camera to meter, or if you used Manual and you’ve exceeded 60’, swap to Live Time (Manual, scroll past 60’, select Live Time).
Live Time is unique to Olympus and is a work of genius. Basically it’s a way of shooting long exposures, seeing it ‘develop’ on the rear screen or viewfinder, and stopping it when you feel it’s right.
There are a couple of parameters to be aware of, and once you know, you’re good to go.
Live time will show a maximum of 24 previews, after which if the exposure is not stopped it will still run, but then you’re guessing the exposure and the final result. It’s set by default to an exposure of 0.5s per Preview, which means you have 12 seconds to play with. Hit “Menu” and a setting comes up allowing you to change the setting from 0.5 to 1, 2, 4, 8 exponentially up to 60’. So you have plenty to play with. The trick is to estimate how long you need and set accordingly. If you think your exposure is 30’, set it to 4’, giving 4x24=96’, plenty to play with without running out of previews.
That’s all there is to it, very easy and very effective. Live Time takes all the guess work out because you can actually see the image developing on front of you, the trick is just to make sure you have enough Previews to use. If your exposure is only a few seconds Live Time isn't the mode to use because chances are you won't be able to stop it quick enough; in those situations just let the camera do the metering and work out the exposure itself using Manual or Aperture Priority.
Composite Image Olympus EM5ii 9-18mm, using Live Time and Live Composite, 10 seconds and 20 seconds.
If I had to recommend which ND filters to have without having lots filling up a bag I would suggest:
5 or 6 Stop ND.
I have both and find I use a 5 more but there isn't much difference. Useful for bright light when you just want a slight reduction in shutter speed and low light when a 10 is too much.
10 stop ND.
The one you will see used the most because of the long shutter speeds you can use. Both would cover just about every need you may want.
And of course a polariser to cut out reflections, not just on water, but to boost colour saturation. And it can act as a 2 stop ND too.
Nisi are I think the best ND filters available today. The IR filtration reduces colour cast more than any other and light transmission is very even, right across the surface. I don't find I'm having to open up corners as much as I used to caused by light fall-off into the corners of the frame, even with super wide lenses.
That’s it, hope it was useful. Remember not every shot has to have a 10 stop ND and super long exposure. Experiment, try different effects and have fun. And once you have a great shot you can get dramatic effects by converting you image to Mono and using the classic Square format too. The key is just to play around with different techniques for different situations and enjoy learning from it.

Index


