A1 Using our Other content feature
Download PDF Version
1. What is the ‘Other content’ feature?
Once you've got the hang of adding sections, images, and articles to a site, you'll want to start adding other content to your site that doesn't fit in the standard model.
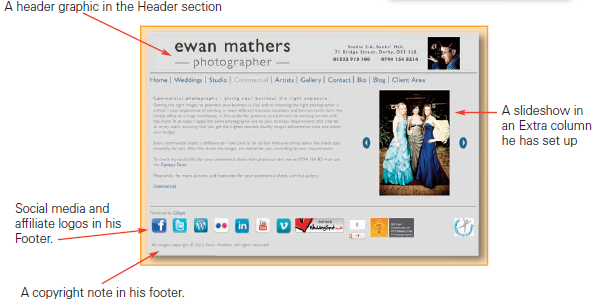
For example, you can add a logo at the top of your site, or a second menu to the footer, or a carousel of images in a side column. In this example, Ewan has added four pieces of Other content.
2. Understanding the page layout
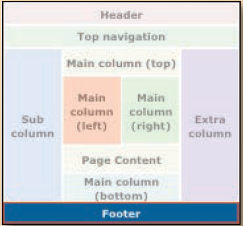
Before proceeding, however, it’s important to understand how your web pages are laid out. Generally, the styles have a header, a footer, a maincolumn, divided into top, left, bottom, and right, and optionally columns on the left and the right. You can add Other content into whichever area you like.
The exact configuration can vary depending on which style you have selected and which page you are on. Some styles have two header areas and two footer areas. We'll show you hot to view a visual layout of your template later.
The easiest way of explaining Other content is to give it a go. So here are three examples.
3. Example 1: Adding a copyright warning to the footer of the website
Here we are going to add a simple copyright warning to the footer of the site, which will appear on every page (we even show you how to get a © symbol!), as Ewan has done in 1. above.
Start by going to Content Other content Click on Options.
They're will be a list of optional content items for your site. Next to the copyright message, click add to site. Now preview your site. You'll see the copyright in the bottom left corner.
To edit the copyright text, click Edit in the preview. Click on the copyright message and in the Settings panel, click edit other settings.
4. Example 2: Add a custom content section
You can add other content section sections to your site just as easily. Start by going to Content Other content. Click on Custom.
Click Add Content Item. Under Type select General. Under Title add a name for your reference such as Gallery opening times
Click on ADD CONTENT ITEM. At the next screen, ignore all of the fields with the exception of the following:
- Text content. Enter the text you would like to appear. In this example enter: Gallery open 10-6 Tue-Sat.
- Apply to sections. Select Show on all sections. Unless of course you’d only like it to appear on one or more specified sections, in which case you’d select Only show on the sections selected and select the sections required.
- Position. In this case we’ll go for Footer, as we want it to appear right at the bottom of every page.
- SAVE and Preview.
We'll look at how to style and position your content item shortly.
5. Example 3: Adding a piece of artwork or logo

You can also add a logo or any piece of artwork to your site and add a link from it. In this case, we are going to add the SWPP logo to the bottom of a home page (The Society of Wedding & Portrait Photographers). We are using the logo for illustrative purposes only, so please be aware that it can only be used subject to SWPP guidelines.
Make sure the artwork or logo is on your computer. In this case we used the SWPP logo provided at www.swpp.co.uk/download.htm. Create a new Other content item in the usual way (type General) and call it, say, ‘SWPP logo’.
For the Image field, click on UPLOAD NEW IMAGE, browse and select the logo saved to your computer. In this case we have selected Sub column for position and applied it to the home page only. We’ve also entered http://www.swpp.co.uk as the URL link, so when the user clicks on the logo they are taken through to this site.
Click Save and Preview your site.
You can also tweak the positioning, something we cover in the next section.
6. Styling and positioning tips for Other content items
6.1 Introduction to Preview edit
The great thing about Other content items is that you can style them and change their position quite easily using our Preview edit facility. If you’re unfamiliar with Preview edit, click on Preview and in your preview click on the Edit button in the top right corner.
You can now edit the styling of your content sections. Click on one to brding up the edit dialogue.
6.2 Example of styling a piece of Other content text

In preview mode, click on the Edit button Click on a piece of text, such as the copyright warning in Example 1 above A popup box will appear Click on Edit next to Font. This popup box will appear. Whilst these fields are fairly self-explanatory it is worth noting the following.
- Font size. To change font size, enter a % figure in relation to what you can see in your preview. Always include the % figure with no spaces.
- Font. Select a font from the default drop down list. This is only a small selection of the fonts available. If you would like to add additional fonts to your default selection have a look at Cliktips Guide E2 Fonts.
- Font align. This can be really useful as it can align the text within its page section to the left, centre or right.
- Test transform. Change the casing of your text.
Once you have changed a setting, clicking on the Set button in the bottom right Then SAVE Refresh the Preview page to see what it looks like.
6.3 Example of the positioning and layout of an Other content item
In this example, let’s assume you’ve uploaded the SWPP logo as laid out in Example 3 above but we need to move its position. Click on Preview and then go to the part of your site where the logo appears Click on the Edit button in the top left corner Select Edit layout of content sections from the drop down to the right of this (third one down) Click on the artwork itself and a popup box appears Click on Edit next to Position Now try some of the following.
- Try different positions on the grid. Click on one of the buttons, which relates to the position within that part of the page, or container SET Save Reload the preview page.
- You could try using the horizontal and vertical Offset function. Just enter a figure in pixels, eg 10 or 15.
- Under the Position drop down box, try selecting Relative to container and repeating the processes above.
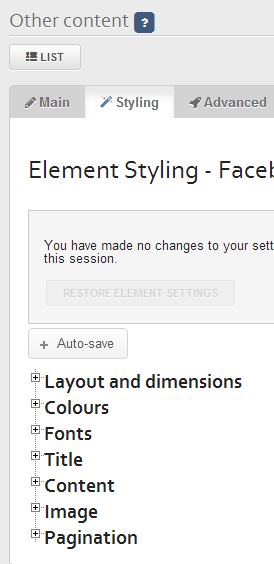
6.4 The Styling tab
You can also access the styling and layout options in the admin system itself by clicking on the Styling tab at the top of the respective Other content record. Depending on what type of Other content it is, there can be more options than in Preview edit.
For example, if it is a carousel, you can specify the number of rows and columns in the carousel, or the size of the images in it. Or if a slideshow, specify the speed it takes to move from one image to the other.
So do look out for the Styling tab to see what’s available and click on the help icons to see what the features are and how to edit their settings.
7. The different ‘Types’ of Other content
Here we explain the different Types of Other content which are presented when you add a new Other content item. There is an excellent array of features! We also provide separate Cliktips Guides for specialised areas which are listed in 9. below.
- General. This is used to add text, artwork and images such as the logo in Example 3.
- Articles. Add a list of articles from a Multi page section. Choose how many you would like to appear and what information you’d like to show. These will automatically be updated as and when you update your articles.
- Menu. Add additional menus, put them wherever you want and link them to whichever sections you like. See also Cliktips Guide C1 Menus and site structure.
- Image / Slideshow. Add an individual image (assign more than one image and it will randomly rotate with each click) or create one of our stylish slideshows Cliktips Guide B3 Slideshows.
- Image panel / carousel. Add a carousel or series of thumbnails. See Example 2 in this guide, as well as Cliktips Guide B2 Carousels.
- Text. Generally speaking we do not advise using this. General is much more suited to text insertions.
- Navigation button. Add your own artwork for navigation buttons.
- Section title. You can actually create an entire web page using Other content. If so, you would add the title using this. See 8.3 below for instructions.
- Location indicator. This adds the section name to wherever you on the page you want it to be, usually at the bottom, so if your user has scrolled a long way down and can no longer see your main menu, they know where they are.
- Links. Have a list of links from your Links section. Choose how many you’d like to show.
- Form. You can use Other content to insert a Contact Form wherever you like, not just in a separate Contact section. See Cliktips Guide C6 Editing forms.[/fieldlist]
8. Useful tips
8.1 Accessing your Other content records
You can access your Other content records by clicking on Content Other content in the admin menu and then following the instructions below.
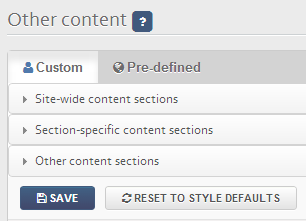
- Site-wide content sections. Click here to open up all records that you have set up to be shown on every page of your website.
- Section-specific content sections. Click here to open up the records you have assigned to specific section/s.
- Other content. This is rarely used, so ignore for the time being.
- Custom tab. The Custom tab (default) lists all the Other content records you have set up yourself. As opposed to the Pre-defined tab, which lists the records we have used to set up your site as defaults. Generally speaking, we would advise you not to use these, unless we have specifically guided you in a Cliktips Guide and/or you are confident in what you’re doing.
- When you click on, say, Site-wide content sections, a list of the Other content records appears. Click on the pencil icon in the far right to access the record, or the bin icon to delete it.

8.2 Make the most of the Live button
It may seem obvious to say, but do bear in mind that each record has a Live tick box. So if you have an Other content record that you want removing but may want it back again at a later stage, simply untick the Live box rather than deleting the record.
8.3 Build from a blank page
You can actually create a blank page/section and then add Other content to it in the usual way. This can be really useful if you find the template structure too limiting for the type of page you require and/or you would like to combine a number of Other content items on one page.
To do this, go to Content Sections in the admin system Click on Add new section Select type Blank section and name it whatever you want Click on ADD SECTION. As with any Section, you can edit the sort order and title.
Now all you have to do is add the content in the usual way.
