E2 Editing fonts
Download PDF Version

1. Introduction
Our system allows you to change the font you use, the font size, text alignment, text colours, even text casing and the spacing between words. You can apply these:
To your entire website.
To certain sections of your site, eg menu, site title, articles, etc.
And/or to elements or part of a web page, such as the header.
2. How to edit fonts
2.1 How to edit the two main fonts
The more fonts you use on your website, the longer it will take for your site to upload when people visit it. We therefore generally recommend not using any more than 2-3 different fonts throughout your site. Typically you use just one or two, one for the main copy and one for the headings.
To edit these, going to Styling Fonts. Click the font you would like to edit A popup box like this will appear.
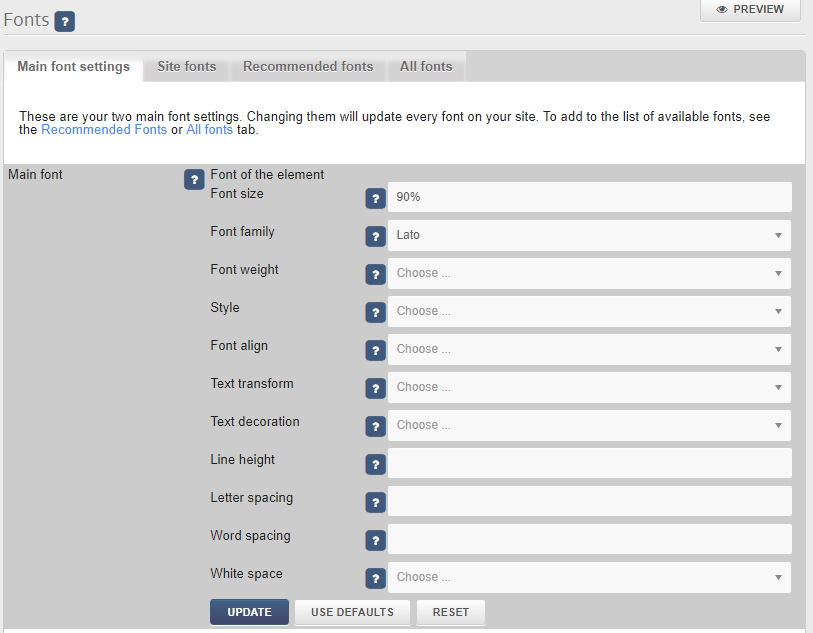
Font size. To change font size, enter a % figure in relation to the default % figure. Always include the % figure with no spaces. Font family. Select a font from the default drop down list. This is only a small selection of the fonts available and it is easy to add more, see section 3. below. Font align. Align the text within its container to the left, centre or right. Text transform. Changes the casing of your text. Line height, Letter spacing and Word spacing. Enter a % figure based on the settings you already have with the default setting being 100%. Don’t forget to include the % character and no spaces, eg 105% for a marginal increase. White space. This relates to the space at the end of text. Try the different options to see how they work.
Once you have changed a setting, clicking on the UPDATE button in the bottom right then Preview.
3. How to add more font styles
To add to the list of available fonts, click on the Recommended Fonts or All fonts tabs.
Recommended fonts. This is a shortlist we have drawn up, as the amount in All fonts can be quite overwhelming!
All fonts. All of the fonts available to you.
Simply scroll your way through the fonts. Click on PREVIEW to see a fuller sample. If you would like to use the font on your site, click ADD to add it to your site fonts.
Please note:
- When you reach the bottom of the selection, the system will need to refresh the page to add some more.
- Don’t forget you can use the search bar at the top if you know the font name.
- Please remove fonts you aren't using to speed up your site
4. How to edit other fonts on your website
To edit the fonts on other parts of your site, you need to use the Preview edit functionality. In your preview, go to the page you would like to edit Click on the Edit button in the top left Click on the part of the page you would like to edit A popup box appears Click on Main settings and then Font. You will see a popup box like the one shown in 2.1 Edit as above UPDATE and SAVE.
5. Some tips
As we’ve mentioned above, try to limit the amount of fonts on your website to 2 or 3.
Always try to use “schemes” to edit fonts. This will keep your fonts consistent across your whole site.
Don't be too specific. Many users will change the size of the fonts for improved legibility.
6. Editing text colours
6.1 Editing the main text colours
You can edit just about all of the text colours on your site by going to Styling Custom styles.
Click on the Colours tab.
Edit the colours for “Text colour” or “Title colour”. Some styles have additional colours.
6.2 Using Preview edit to change other text colours
You can also add custom colours to apply to any individual content item as you like.
First add the custom colour in Styling Custom styles Colours.
Then Preview and edit your site. When you edit a content section the new custom colour will be available to choose from.
