A5 Adding a Search facility
Download PDF Version
1. Introduction
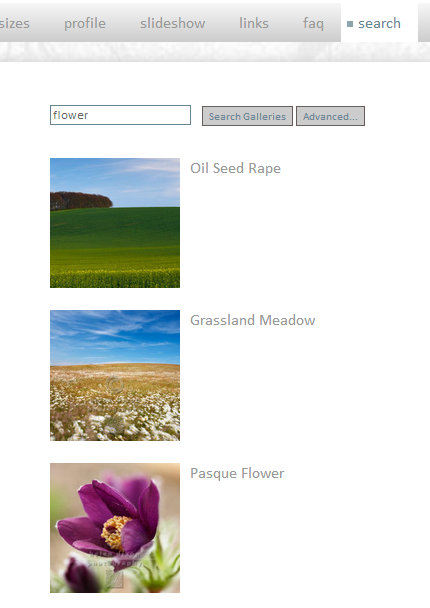
Our system allows Pro and Super Pro subscribers to add a search facility to their site. The search box can be added to just about any part of your site and the search itself relates to any text fields you have entered against an image record, such as Caption, Description, Keywords, etc.
You can restrict the Search to certain galleries, to only those items that are for sale, to specific image categories that you can optionally set up. You can even do some formatting of how the results appear. It is therefore ideal for anyone with an ecommerce site and/or image library.
2. Adding a Search section
To add a search facility, firstly go to Content Sections and click on Add new section (up at the top) Select Search from the Type drop down menu Enter a name, eg Search. At the next screen, we generally recommend unticking Show in menu, unless you would like a separate section with its own search.
3. Adding a search box to your site
You now need to add the Search box to your site (unless you have ticked Show in menu in 2. above, in which case it will appear as its own section). This is done using our Other content feature, which means you can show it on just about any part of your site.
To do this, click on the Content tab at the top Then click on edit (the pencil icon over on the right) against the Search record (NOT Search results!). At the next screen, here are the fields you need to complete:
Apply to sections. If you would like the search box to appear on all sections, select Show on all sections. If you would like it to appear on just one or a selection of sections, select Only show on the sections selected.
Sections. If you have NOT selected Show on all sections, select which sections you would like the box to appear on, eg Gallery.
Position. Select which position you would like your box to appear on. It is definitely worth trying a few. Preview them to see what they look like. And if you have selected more than one section for it to be shown, do make sure you Preview all of the sections affected.
Show title. If ticked, then the title will show above the box, eg Search.
Save and Preview.
4. Search options
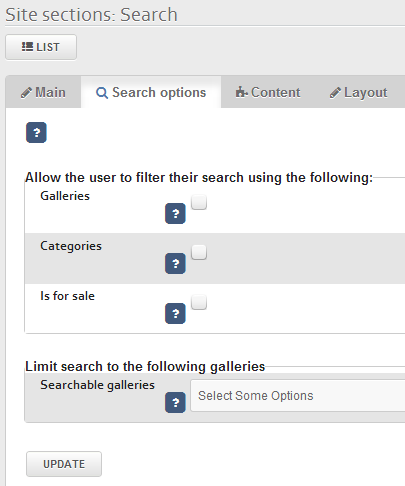
The search you have just set up applies to all of your image records. However, you can allow users to search within, for example, specific galleries only and/or narrow the search criteria down. These options are controlled by clicking on the Search options tab right at the top of Search record in Sections, as shown here. Tick on each of the boxes as required:
Galleries. Ticking this box will allow users to filter their search by gallery.
Categories. Allows users to filter their search by image category, something we explain in 4. below.
Is for sale. You can opt to allow users to search for images that are for sale only.
Limit the search to the following galleries. By default, all your public galleries will be included in the search. If you want to exclude some of them you can do so by using this field.
5. About image categories
We have set up Image categories if you would like more control over the search fields that can be used, ie beyond Galleries and Is for sale. The general idea is that you can create as many Image categories as you like, assign images to them, then your users can filter their search against these categories. To do this, go to Images/Galleries Image categories New Then you will need to spend time and care in assigning whatever images you have to the respective Image category. This is done in the admin system within your Images records.
This feature isn’t for everyone, as you could consider adding keywords as an alternative.
6. Formatting the results
6.1 Limiting the number of results and using pop-ups
You can limit the number of results that appear per web page. So if there were, say, 100 results for a particular search, you can tell the system to limit it to, say, 30 per page.
You can also set up the results so that when the user clicks on a thumbnail, a pop-up appears, rather than linking to the product detail page. The benefit of this is that the user doesn’t have to click the back button and/or reload pages to get back to the search results.
To apply these, go to Content Sections and click on edit against your Search section Click on the Content tab at the top Click on edit against the Search results record (not to be confused with the Search record!) To limit the number of results returned, amend the Max records field. If you would like to use the pop-up facility described above, tick the Use popups box.
6.2 Styling the search results
There are also some useful styling options available, such as changing font, column and page alignments, text colouring, etc. As with 6.1, these can be found by clicking on edit against the Search results record and then clicking on the Styling tab at the top. Alternatively, use the Preview edit facility. If you are unsure about these styling features, have a look at Cliktips Guide A1 Other Content – there’s some really useful stuff in there!
