B1 Preparing your own images
Download PDF Version
1. Introduction
It is important for any website that images are compressed for web use. This makes your website much quicker and easier to view. When images are uploaded into our system, it does a pretty good job of compressing them for you without losing too much quality. However, if you want optimum image quality and control – especially for larger images - it’s worth doing them yourself.
Also, when using our bulk upload function, larger images may be resized by your browser if they exceed its settings for maximum dimensions – rather than our system. If so, the quality will not be as good, which can be avoided if they are prepared offline.
2. Preparing your images
2.1 General
For photos we recommend you save your images in JPEG format, but you can also upload PNG or GIF files. It is common to save images for web use at 72 ppi, but you can use any other value if you wish. The file names should not contain spaces or punctuation.
To ensure that your images are not compressed or resized during upload please ensure that:
- The image dimensions are within the limits specified in Images/Galleries Image settings.
- The image file size is less than 400kb.
- You should also remove any EXIF data that might be attached to the file, in particular any orientation data.
2.2 Maximum sizes
*To find out the most effective image size for the template you are using, click on Images/Galleries Image settings. Our default settings include a maximum width and then apply a relative ratio for the height. That said, we generally recommend that the height does not exceed the width too much - to avoid your users having to scroll down, as well as slideshow distortion. Also, you can change the settings so that there is a fixed maximum height and the width is variable. This can look really effective. See 2.6 below. *We do not recommend uploading images larger than our guidelines as this can cause blurring and “artefacts” – and you may have to manually adjust your site width settings. The exception to this is if you use our pop-up feature for your image enlargements, see Cliktips Guide B2 Carousels and pop-ups for further information.
2.3 Compression and file sizes
Images should also be compressed to around 70-80% compression (sometimes called Good). The image mode should always be sRGB (called simply RGB by some image processing software). There is a “threshold” image file size of 400kb. If you upload images larger than 400kb, the system will automatically reduce their quality to 80%. If you wish to ensure the pictures on your site are exactly the same as the files you upload, ensure they are all less than this size. If you are not sure what these terms mean, please see 3. below for guidance. If you have a copy of Adobe Photoshop Elements, you can process all your photos at once, see 4. below.
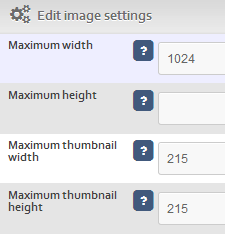
2.4 Check Image settings in the admin system
Before uploading your images, it is worth double checking that your Image settings are consistent with the sizes you have prepared. To do this, go to Images/Galleries Image settings You can click on Use values to load the recommended settings SAVE.
If you would like the height to be fixed and the width variable, enter a maximum height at this point.

2.5 Image file names
When bulk-uploading images you can save yourself hours of time if you save your image file names correctly, as the system will automatically generate a caption for you when bulk uploading. Search engines not only pick up these captions, but they also pick up the file name used on the image, so it can be really beneficial for you.
For example, a file name of Flying_Osprey.jpeg will generate a caption of “Flying Osprey” on your web site, with the underscore acting as a space. In addition, if you need a unique reference ID (normally for shopping cart purposes), put the reference at the start of the file name followed by a hyphen, eg if you use the file name 123-Flying_Osprey.jpeg, then a reference of “123” will also be generated.
2.6 A note on thumbnails
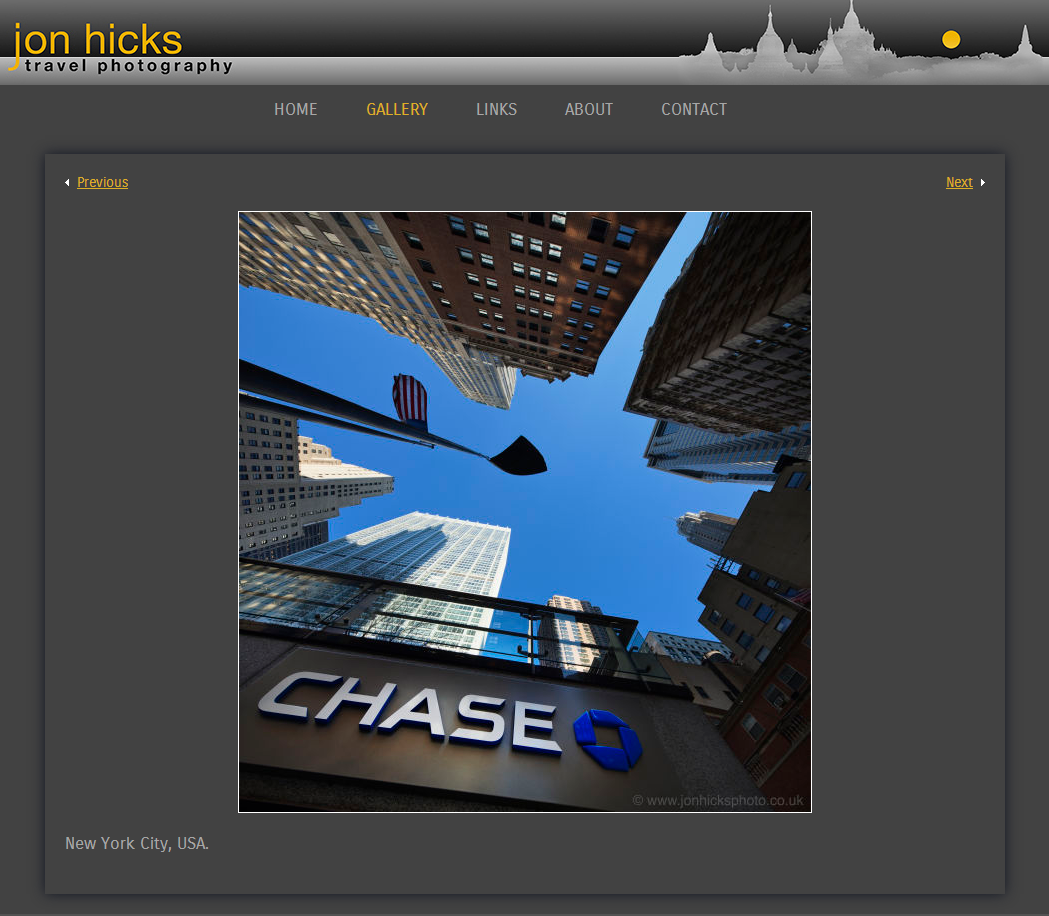
Many of our users prefer their thumbnails to be a consistent shape, typically squares, such as Jonathan Chritchley in this example. To change your thumbnail dimensions, all you have to do is enter the width and height in Image settings and click on Crop thumbnails. Our system will automatically re-size/crop them. You will need to re-upload images that you have already uploaded or you can go to the respective image record and click on Regenerate thumbnail.
You can also prepare them yourself, which some of our users like to do (especially for portrait images where our system might crop out, say, part of a head). You will need to tick Manual thumbnails in your Image settings and enter the dimensions you are using. You can either upload them on a one by one basis (the system has now added an extra field in the respective Image record for this). Or if you name them xxxxx_thumb.jpg our system will automatically assign them to the image named xxxxx.jpg.
3. Using Photoshop Elements to process your images
If you have a copy of Photoshop Elements or a full copy of Photoshop, you can process all your images for upload in one go using the Process multiple files function. Follow these instructions to do this. Please be aware that batch processing is a very disk-intensive activity and you should ensure you close all other applications before starting. Also ensure you have plenty of free space on your hard drive and – if you can – defragment your hard drive.
qPut all the photos to be processed into a single folder.
wCreate a folder to save your photos for upload.
eStart Elements in Full Edit mode by clicking Edit in the Welcome screen. Or, if the Organizer is already open, click the Editor button located near the top right corner of the Organizer window, and then choose Full Edit from the menu.
rIf the Editor is already open from an earlier exercise, switch to Full Edit mode if necessary by clicking the Full tab in the Edit pane of the Task panel.
tChoose File Process Multiple Files.
yIn the Process Multiple Files dialog box, choose Folder from the Process Files From menu Under Source, click Browse. Find your folder of pictures. Click OK to close the Browse for Folder dialog box Under Destination, browse for your destination folder.
uIf you wish, you can adjust the filename, but again it is better to do this to the original file.
iMake sure you are happy with your sharpness and colour balance before you process your images (Advanced users of full Photoshop will have more options here).
oUnder Image Size, tick Resize Images. Change the resolution to 72dpi. Enter 800 as the maximum width (or your chosen maximum width from your site settings).
sUnder File Types select JPEG High Quality. DO NOT select Max quality as the files will be uncompressed and unsuitable for the web. Click OK to process the files.
4. If you don’t have Photoshop
There are some useful free resources available on the web such as www.irfanview.com. These also do a pretty good job of compressing your images without too much loss of quality.
5. Be organised on your computer!
We recommend having a folder on your computer for your web images. Add sub folders for each of your galleries and place the images within the respective gallery folder. When it comes to bulk uploading this will save you a lot of time and hassle. It may also be worth having a second main folder with your high resolution images. Should you wish to change templates at a later stage and need to change image sizes, then having them all in gallery order may prove to be useful.
