A2 Adding a header graphic
Download PDF Version
1. Introduction
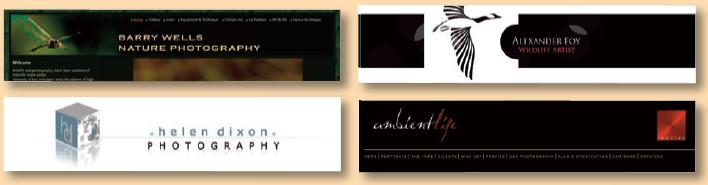
Adding a customised header is probably the best way to create a personal touch to your site. It appears in a prominent position on every page of your website, allowing you to create your own feel, look and brand. You will need to be able to create a JPEG, GIF or PNG file using your choice of image editing software such as Adobe Photoshop, Illustrator or Elements. If you do not have access to such software, skip straight to section 6. where we show you how to use the admin system to style the text in your website header – change font, font size, colour, alignment, etc.
2. Sizing your Header Graphic
The size and shape of your graphic is very much down to you. However, we would not recommend making it too deep, as it may start taking up too much space on the screen. To a degree, it is down to trial and error, although you can always take a screen-shot of your site, and then measure the header area or even create a header over the top of it (use a new layer if your image software supports it).
How to get a screen grab from a PC
qPress “prt Scr” twice. This button is usually towards the top right of your keyboard.
wOpen your photo editing package and create a new blank document.
ePaste the screenshot into the document.
rIf possible, trim off anything bar the central content of the page.
To send a screenshot from a Mac
qHold down “Command” (Apple key), “Shift” and “3” to copy the screen to the clipboard.
wFollow the PC instructions from step 2.

3. Background issues
In order that your header graphic fits in with the rest of your site the background colour must be chosen to match that of the colour scheme that you are using, unless of course you want a contrasting background for a particular effect. The best way to do this is to create a GIF or PNG with a transparent background. Alternatively, you could take a screen grab of your site and then use the “dropper” or colour select tool to find out the background colour, although this can sometimes be tricky to do.
4. Create the image!

Now that you’ve decided on the size and background of your image you’re ready for the fun part – creating the image! This part is entirely up to you. As with all other images on your site, we recommend that you save your header image as a JPG at 72 dpi with a compression level of 70-80% (use “Save for web” if using Photoshop), although GIF and PNG images are also supported for header images.
5. Uploading your Header Graphic
A whole range of non-standard content can be uploaded to various parts of your website using our Other content feature, including your header image. (Incidentally, if you haven’t used our Other content feature before, do have a look at Cliktips Guide A1 Other Content – it really is a useful piece of functionality!)
qPreview your site in your admin system
wClick on the Edit
eClick on your site title.
rClick on edit other settings
tThen in the Image field click on UPLOAD NEW IMAGE and browse to locate your header graphic. SAVE record to upload.
Preview to see what it looks like. Try looking at it on a number of pages of your site, not just your home page.
6. Using the admin system to style your header/site name
6.1 Getting to the styling options
If you are unable to generate or use your own artwork for your header, there are still some excellent styling options available within the admin system. The easiest way to access these is to click on Preview In the preview itself, click on the Edit button in the top left Click on your site name in the header A popup box will appear. Click on the Main tab for settings.
6.2 Styling and aligning the font
Scroll to find the Font and click it to edit your font settings. This popup box will appear. Whilst these fields are fairly self-explanatory it is worth noting the following:

Font size. To change font size, enter a % figure in relation to what you can see in your preview. Always include the % figure with no spaces. Font. Select a font from the default drop down list. This is only a small selection of the fonts available. If you would like to add additional fonts to your default selection have a look at Cliktips Guide E2 Fonts. Font align. This can be really useful as it can align the text within your header to the left, centre or right. Text transform. Change the casing of your text (some of our templates default to upper case, so here you can select whatever you want).
Once you have changes a setting, clicking on the Set button in the bottom right Then SAVE Refresh the Preview page to see what it looks like.
6.3 Changing text colour
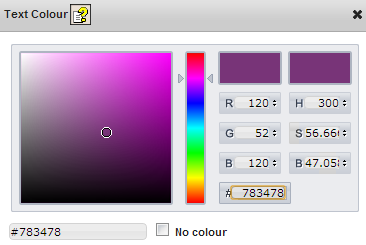
This is done by clicking on Edit against Text colour Adjust the slide bar to change the colour selection Click on the square box to select the colour Click on Set SAVE Refresh the page to view. Tips:
- Each colour has a unique reference which is displayed in the field under the main square colour chart, eg #783478. Take a note of this reference, so if you want to use this colour elsewhere on your site all you have to do is enter it in this field.
- To select white, left click in the top left corner of the box and then drag slightly over the top left corner. Or enter colour reference #ffffff.
- To select black, it’s exactly the same process but with the bottom right. Reference #000000.
