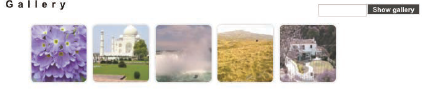
B5 Our gallery isolation facility
Download PDF Version
1. What is the Gallery isolation facility?
Available only to our Super Pro customers, the Gallery isolation facility allows you to display a gallery of images without it appearing on your main web site. This may be useful if you would like the gallery to be seen by a limited audience only, such as a gallery of wedding photographs or draft work for a customer.
It can be accessed in two ways. Firstly, if your domain name is www.weddingphotographer.com and your customers are Tracey and Bill Smith, you could set up a special gallery entitled traceyandbill. They could then view this gallery at www.weddingphotographer.com/traceyandbill.
Secondly you can also set up a password box so that if your users entered the code traceyandbill, they would see the gallery. This box can be added to just about anywhere on your site.
2. How to isolate a gallery
To isolate a gallery, you must have firstly set up the gallery in the usual way, namely Images/Galleries Galleries click New to create one, or if you have already set one up, click edit against the respective record, the pencil icon end right Untick the field Show in list and then enter a Code as instructed. The code should contain no spaces or punctuation and must be different for each gallery. This will be the password for your users to log onto their gallery, as well as the address suffix on your domain, eg www.joebloggs.com/traceyandbill.
Once you have clicked Make live the gallery can be seen on your live site by entering your domain name followed by your code, eg www.joebloggs.com/traceyandbill.
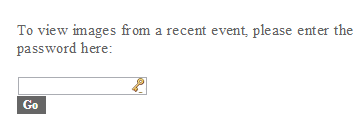
3. How to add a Gallery log in box
You can also add a log in box like this one to enable people to access their isolated galleries. This is done through our Other content feature, so it can be added to just about anywhere on your website and can be styled and moved around the page.
If you haven’t used this before, go to Content Other content At the bottom of the page Add new content item Select Log in panel and name it eg Log in ADD CONTENT ITEM. At the next screen, leave all of the fields as default with the exception of the following:
Apply to sections. Show on all sections, or select the sections you would like the box to appear on.
Sections. If you have NOT selected Show on all sections, here you can select which sections you would like the box to appear on.
Position. Select which position you would like your box to appear on. It is definitely worth trying a few. Preview them to see what they look like. And if you have selected more than one section for it to be shown, do make sure you Preview all of the sections affected. See also the note below.
Show title. If ticked, then the title will show above the box, eg Log in.
SAVE and Preview.
Note: Please note, positioning an Other content item can be a bit hit and miss, so do try 2-3 positions. It is also possible to fine tune the position using our Preview edit facility. If you are unfamiliar with this, it is definitely worth having a look at our Cliktips Guide A1 Other Content guide, as this can open up a whole new range of other options to you.
