B4 Adding borders to your images
Download PDF Version
1. Introduction
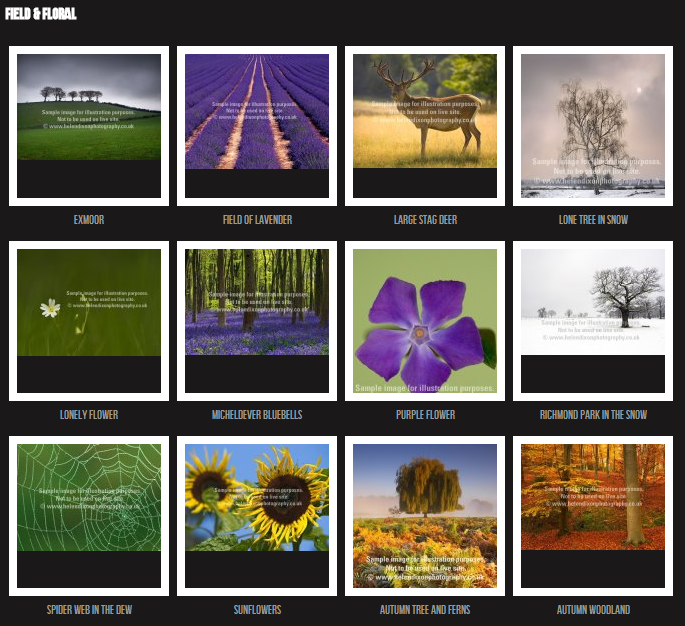
Each part of your web site is enclosed within a border or frame – including your images. Our styling system allows you to display these borders, to increase/decrease their width, change their style (eg solid, dashed, groove, etc) and even change border colour. This can be particularly effective for images, as you can create a fancy framing effect throughout your galleries without having to prepare them in, say, Photoshop. You can also have different settings for your thumbnails than your enlargements. In this example we have created a white solid border around all of our images.
2. How to change your image border settings
2.1 Finding the settings
This is controlled by clicking on Styling in the admin system Custom styles Click on the small box next to Page dimensions and settings Then the small box next to Image options. You will see a screen like this.
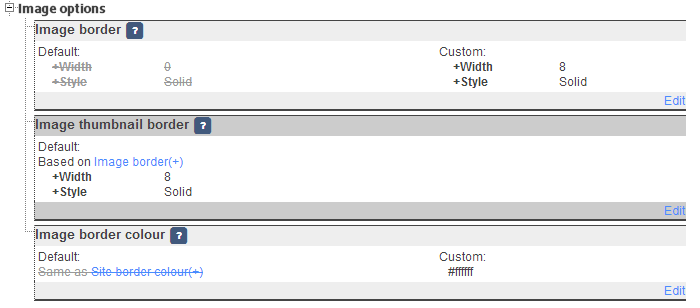
Image border. Click on edit to control the width and style of all your image borders by following the instructions in 2.2.
Image thumbnail border. If you would like different border settings for your thumbnails, click edit here and follow the instructions in 2.2.
Image border colour. This is where you go to change the border colour for both thumbnails and enlargements (you can’t have a different colour). See 2.3.
2.2 How to edit image borders/frames settings
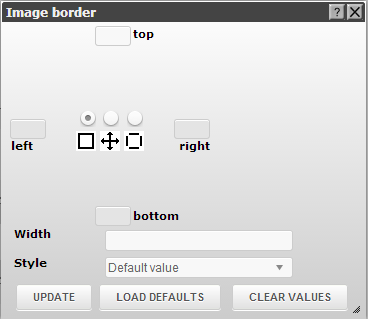
When you see this popup box all you need to do is enter a figure in pixels in the Width box. Start with say, 7 or 8 Then select a Style from the drop down options. Most users select Solid but it may be worth trying some others Click on UPDATE and Preview to see how it looks (don’t forget to look at both thumbnails and enlargements).
In the unlikely event you would like different settings for the sides as opposed to the top (or even for all four!), scroll over the three circles in the middle and click on the one that applies to what you would like to do. Then enter the required pixel width as prompted.
2.3 How to change the border colour
This is done by clicking on Edit against Image border colour. Adjust the slide bar to change the colour selection Click on the square box to select the colour Click on Set SAVE Refresh the page to view. If you’re not used to using a colour picker, here are some tips:
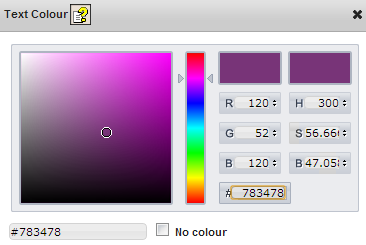
Each colour has a unique reference which is displayed in the field under the main square colour chart, eg #783478. Take a note of this reference, so if you want to use this colour elsewhere on your site all you have to do is enter it in this field.
To select white, left click in the top left corner of the box and then drag slightly over the top left corner. Or enter colour reference #ffffff.
To select black, it’s exactly the same process but with the bottom right. Reference #000000.
3. Adding borders elsewhere on your site
3.1 To ‘containers’ or sections of a web page
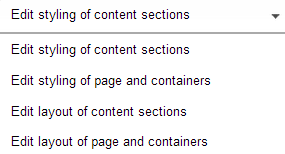
It is also possible to add borders to certain parts of your web pages. The best way of exploring this is to go into Preview edit. If you’re unfamiliar with Preview edit, click on Preview and in your preview click on the Edit button in the top left corner To the right of this is a drop down menu with four options Select the third one Edit layout of content sections.
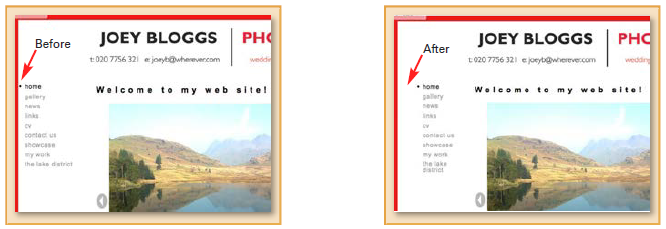
You will notice different areas on the page that are shaded in grey, which we refer to as containers, as they each ‘contain’ a piece of data for that part of the web page. You can now apply the same border/frame styling to each of these containers Just click on the container in question and a popup box will appear Click on Edit against the Border field You will see the same controls as in 2.2 above Give some a try and see how you get on.
3.2 To your entire website
You can also add a border around your entire website. Whilst this is rarely used it can sometimes be quite effective, eg adding a subtle black trimline around a white website. This is controlled by going to Styling Custom styles Click on the small box next to Page dimensions and settings Then the small box next to Layout and dimensions Scroll down until you see the two fields Site border and Site border colour Edit as instructed above.
3.3 Padding and Margins
If the border line is too close to the content it surrounds, you can add Padding to increase the space. To access the Padding menu in Preview edit mode, this is again found in the menu option of Edit layout of content sections. (For the larger sections of the page, select Edit layout of page and containers).
Then click on the part of the page you have added the border to Click Edit against the Padding option. Enter, say, 5 or 10 against the Top/bottom or Left/right, depending which you would like to add the space to Click on Set Click on Save all to save, or Clear to try again.
Margins work in exactly the same way but they relate to the space between the outside of the container and whatever is around it. Try giving it a go to see how it works.
