A9 Creating a blog
Download PDF Version
1. Introduction
A blog can be a great way to give your website visitors an insight into who you are and the work that you do. Our system makes it really easy to create them using a Multi page section, which allows you to list a series of Articles, typically in date order with an optional link for further information. Ideal for blogs, news pieces, admin notices, etc. Here we show you how to create one, as well as some styling and layout ideas.
2. Stage I: Creating the Section
The first stage is to create the main Blog section. Click on Content Sections Under Add new section (in the top left), choose Multiple page section from the drop down menu Enter the name of that section (eg Blog) Click on the ADD SECTION button Whilst most of the fields are self-explanatory, here are some brief notes if you’re unsure of any of them.
qTitle. Appears in your main menu and section heading, eg Blog.
wIntro. The text that appears at the top of the section. Leave blank if not required.
eShow in menu and Sort order. Tick for this section to appear in your main menu and use Sort order for where you want it to appear in the menu.
rParent section. Leave for the time being.

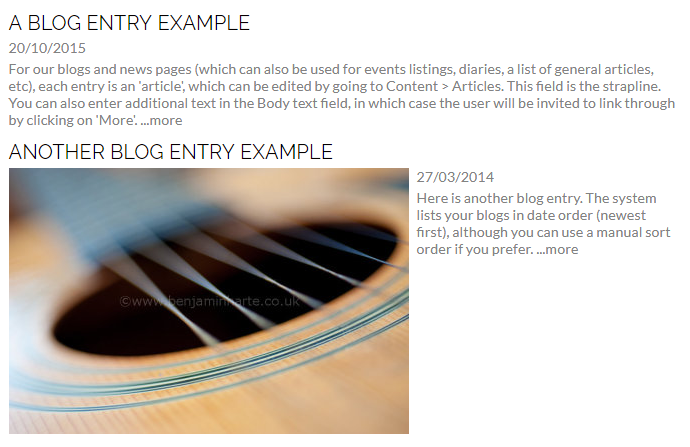
tSub menu. If you tick Use sub menu then the article headings will appear as drop downs when the user hovers over the menu heading (see upper right for an example).
yShow dates. Tick if you would like the dates to appear, in which case the system will list articles in date order (most recent first), unless you override by using the Sort order in the respective article.
uShow strapline. Tick this box to show the introduction from each article on the list page. We recommend you use this option.
iShow link and Link text. If you want links to be shown, tick here (recommended). This defaults to ‘….more’ but you can change it to whatever you want.
oLoad content inline. If you tick this box, the main text from the article drops down, rather than linking through to a fresh page. (See upper screen grab).
aShow images. This is quite a handy feature. If you post an image on the article, then it will also show as a thumbnail on the main list of articles page.
sKeywords and Use comments. Leave these two blank for the time being.
dSAVE
fArticles tab. Tip: this tab is handy to view, edit and add Articles for this Section (see 3. below).
3. Stage II: Creating Articles
Now that you have created your main Blog section, you can now post individual entries to the blog, or Articles. To create an Article Click on Content in the admin system Articles Click on New at the very top, or click on edit (the pencil icon) against one of the default articles.

qSection. Select which Section you would like this Article to be assigned to. (Very important or else it won’t appear!)
wHeadline. This appears at the top of the article.
eStrapline. The introductory text. Sometimes it’s worth copying this into the start of the Body text as well, as Articles can sometimes be viewed without the Strapline, which may cause confusion.
rBody. This is the main body text for the Article.
tMain image. If you upload an image it will show at the top of the article as an enlargement (to change the image dimensions for your articles, click on Content Articles Article settings).
yDate and Sort order. If you have selected Show dates when setting up the Section, then the date you enter will appear here and all articles will be listed in descending date order. Otherwise you can use Sort order (if so, remember to use high numbers, eg 10, 20, etc, so that if you need to change it at a later stage, you have more flexibility).
uDon’t forget to click on SAVE when you’re finished!
Once you have entered a few articles, have a Preview to see how it looks and works. All you now have to do is keep your blog up to date!
4. Adding images
Each article can have a “main” image that can be shown on the listing page, the main page, or both.
To select which images to show in an article list, edit the section and in the "Show images *" field, select “Show thumbnails” or “Show full size images”.
If you don't want to show these images on the main page, it's more complicated. You would need to edit the relevant content section and set it not to show on the section in question. For information on how to do this, see Cliktips Guide C2 Formatting text
5. Other formatting
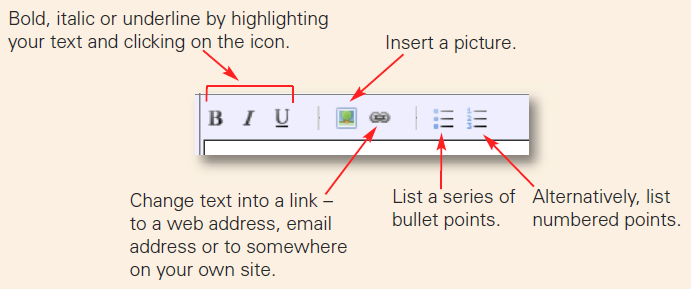
5.1 Don’t forget you can use our text formatting features
Spice up your blog entries with some text formatting, or inserting additional images. Converting text into a link is also a good way of making your site look professional. Further instructions can be found by downloading Cliktips Guide C2 Formatting text.
